Showing posts with label 3D item. Show all posts

Tuesday, November 30, 2021

Mason Jar Die Cuts Gift Bags


Aren't these mason jar die cut
mini "gift bags" adorable ?
I was gifted them last year to assemble myself.
Fun! 

I added small paper punched circles
coated with red glitter glue to the holly
and ribbon or twine around the "neck".

I also used ink and an aquapainter
to brush veins onto the leaves.


before


Thanks for looking =) 

Saturday, November 20, 2021

Butterfly Beauty Box Card


So glad I found this neat card idea online!
It wasn't too difficult to make
(other than die cutting and assembling the butterflies).
I made this for my mom's birthday.
Normally I don't make duplicate cards,
but because I had so many butterfly bits leftover,
I made a second and sent it to my hubby's
long time friend/second mom.

All supplies used came from Stampin' Up!
 Butterfly Beauty thinlits dies
Ornate Floral 3D Embossing Folder

Instructions found here:
https://juststampin.com/2019/08/27/x-is-for-box-2/

Thanks for looking =) 


Monday, October 14, 2019

Happy Purrthday


Enough sympathy card posts for now.
It's time to move on to sharing the half dozen cards
I made over the weekend of World Card Making Day/Digital Scrapbook Day !

I'll start with this adorable swing card with cute partying cat images.

I found this stamp set with matching dies at a yard sale recently. 
New, never used, until now when I made this card !
It is by Lawn Fawn and called Meow You Doin'.

I also used a Flip It card die from Sizzix

The images are stamped on water color paper
then colored with ink from my dye ink pads 
using an aqua painter. 

They are die cut then popped up on dimensionals.

All inks and papers were from Stampin' Up!

The stitched circle die is from The Stamps of Life.


Bonus Project:
a coordinating "candle holder cake topper"!


Topper stuck in a slice of home made New York style cheesecake
I made for the birthday girl.

I didn't really want to poke 28 candles into the
top of the pretty cheesecake, so I made this single
candle holder/topper for her slice.
This also tells me when looking back at the photos
in the future that it was her 28th birthday
and
it kept germs from being spread to the rest of the cake
as she blew out the single candle on her slice ;)

If you are interested, here is the recipe I used.
It turned out beautifully and was delicious. 


Thanks for looking =) 


Saturday, June 1, 2019

Tool Box Gift Box - tutorial


Time for the new anything crafty goes challenge at
We are a month long just for fun challenge site.
Won't you share what craft project you've made with us ?


This month I am sharing a "gift box" I made from scratch.
I knew the recipient likes chocolate oranges,
so I wanted to make something fun to present them in.
I also added a gift card.


Basic how to's:


Use your math skills to create the size of box
and ends you will need to hold your treats.

I used chipboard to build my box with.
A heavy duty double sided adhesive tape was used
to hold it together. 


This photo shows the pattern for the end 
I made from scrap paper, ready to be traced
onto the chipboard then cut out with scissors.


The ends of the box cut out with holes punched
at the tops to push a dowel rod through to
create the toolbox handle.


Assemble with your favorite heavy duty adhesive.

I painted my chipboard pieces with glossy
acrylic craft paint after it was assembled. 


Once again, put those math skills to use 
to create a tray to fit in the top of the toolbox.
I used red card stock for the tray.


The tools were created with a die set from Stampin' Up!
Silver metallic card stock for the metal parts
and Crumb Cake stamped/sponged with ink
for the wooden parts.


I added a small envelope on the underside
to hold the gift card.
Ignore the Merry Christmas sentiment ;)
It just so happens that is what the project
was actually made for,
but I wanted to wait to share it with you now.
I thought it would make a fun design team
project for the month of June, Father's Day. 


I ran a piece of dowel rod through two holes
punched at the top of the ends.
It is removable to get the treats out.


So much work - but fun making it ! 


Thanks for looking, have a great day :)

Saturday, December 1, 2018

Crackle Painted Reindeer


Today's project is another "repurposing" of an old item
that I made from a destined for the trash piece of home decor.
We don't know where it came from, but my daughter came across
it when she was moving and wanted to throw it away or donate it.
I knew this plain old wooden deer shape had potential
and that it wouldn't take much to update it, so I took it :) 

A little crackle paint then hot gluing
on of some greenery and twine. 
Ta-dah, greatly improved !
(I think my daughter wants it back now)


This project is my design team project for the 
We are a month long anything crafty goes challenge.

 Share what crafty project you are working on this month with us!


HOW TO

In addition to the item you want to crackle. you'll need:
two contrasting colors of acrylic craft paint
a crackling medium
wide paint brush
decorative embellishments
hot glue
Optional:
antiquing medium and old rag
brown paint and an old toothbrush to splatter with
(I didn't end up using them on this project, but have in the past)
I've had the supplies pictured in my craft hoard for quite some time. I assume they would still be available but perhaps by different manufacturers


I removed the ribbon bow and wiped the wood down well. Since it had the brown stain already, I decided to crackle over that. Normally you would paint a base coat of a contrasting color to your top coat when crackling.


Apply a nice even coat of the crackling medium and allow to dry thoroughly before the next step. It has a nice glossy sheen to it when wet.


Once the crackle medium has dried (notice it looks flat now), apply your top coat of paint.
NOTE: you want to apply the paint in one direction and only one layerusing a wide paint brush. Do not go back over it and try not to overlap the edges. Going back over it ruins the look. The crackle is almost immediate, depending on the weather conditions. The thicker the layer of paint, the wider the crackle lines. The thinner the layer of paint, the finer the crackle lines. You may want to experiment first to see how it reacts and what you like.


Crackle painting is a fairly quick and easy way to update a piece of home decor.
 It's also a fun technique, watching the paint react with the crackle medium!
This is a thick layer of cream paint over the crackle medium , creating larger cracks. 


I painted the opposite side with a thinner layer of paint to show the difference it makes
 versus using a thick layer of paint.


Once the crackled paint dries, you can rub on antiquing medium . You could also splatter it with an old toothbrush lightly dipped in paint to create a fly specked look.

Hot glue on your embellishments and if you wish to make it an ornament, add a hanger of some sort.

That's all  there is to it ! Have fun finding things to crackle !


Happy Holidays ! 


I'm entering my project in the following challenges:

Merry Little Christmas Challenge - Anything Goes December
https://merrylittlechristmaschallenge.blogspot.com/2018/12/mlccb-5-december-anything-christmas-goes.html


Christmas Crafts All Year Round - Anything Goes December
https://christmascardsallyearround.blogspot.com/2018/12/december-challenge-anything-goes.html

Crafting By Designs Christmas
https://craftingbydesigns.blogspot.com/2018/11/get-ready-for-christmas-november-edition.html

Through The Craft Room Door Anything Goes


Thanks for looking =)

Thursday, November 1, 2018

Plaster Flowers Plaque


Here we are, the first of November already !

If you happen to be crafting anything for 
the upcoming holiday season,
we'd like to see it at the
We are a month long,
family friendly anything goes craft challenge. 


I'm sharing my design team project for this month today.
It was a wooden hanging heart plaque
that I picked up at a church yard sale fundraiser
this past Spring knowing I wanted to repurpose it somehow.

Although I have oodles of decorative papers in stock,
I wanted to print out a digital paper and element
to use on this hybrid project to show that
digital scrapbooking kits can be used for more
than just scrapbooking.
(NOTE: elements are from a kit by Kimeric Kreations
that were available exclusively at The Digichick.
The designer, Kim, passed away this summer
and the site was taken down. However,  some of her
gorgeous kits will be available once more at
MyMemories! )


Word strip and printed paper


I placed a piece of light weight scrap paper on top
of the wooden heart. I lightly pressed around the edges
of it then ran the side of a pencil lead along it to get 
the shape of the heart. I cut the pattern out then traced it on the
back of the printed patterned paper. I cut it slightly larger
knowing I was going to "distress" the edges. 


I cut a piece of chipboard to fit behind the word strip.
This gave it a bit of dimension when it was glued on
top of the patterned paper. 


This was my first attempt at making
plastered silk flowers - a messy process !
Simply dunk the "silk" flowers into plaster
mixed according to the package directions.
Work fast since plaster starts drying quickly.
They may need shaped a bit when laying them out
on wax paper to dry. Allow at least 24 hours to dry.


I think I need more practice with this technique ;)


I used paper punched pieces of white card stock
to fill in among the plaster florals.


Thanks for looking =) 


Monday, October 1, 2018

Mini Halloween Diorama


Today I'm sharing my design team project for the Love To Craft Challenge Blog.
We are a month long anything crafty goes craft challenge blog,
won't you share what crafty project you are working on ?


My project is a silly little way to repurpose a box
that once held embellishements.
It was a pumpkin shaped box and quite sturdy,
so I saved it in my "I'm going to do something
with that someday" drawer full of  "trash" to repurpose. 

I decided to make a sort of diorama out of it.
I painted the inside with black acrylic craft paint.
I adhered a piece of decorative paper trimmed to fit
(Die Cuts With A View).
I stamped and cut out two jack o'lanterns
(Stampin' Up!) then attached them
with dimensionals.
I hot glued in some "moss" and
a couple of paper punched leaves. 
I made a little wood look sign with 
various stamps and ink then attached
it with thin wire. 

Thanks for looking =) 

Wednesday, August 1, 2018

Beach Scrapbook Jar


The first of August -
time for a new challenge at 
This is an anything crafty goes
(so long as it is family friendly)
 challenge that lasts all month.


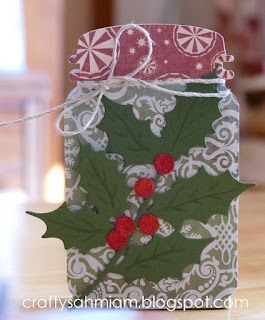
My project is a beach memory jar 
that I finally got around to making !
I've had the sand and shells in the 
large 4 sided jar for quite some time,
but I never got around to decorating it. 
I decided I'd make a mini "scrapbook page"
to insert rather than just a simple photograph.

I used a digital scrapbook kit to make my jar.
Those are not real shells hanging on the side,
just images from the kit printed on photo paper. 
At first glance they look real!

(Scrapbook kit used was
Everyday Stories The Beach by Kimeric Kreations,
but it is no longer available )


I punched a hole and added a metal eyelet to the tag
to run the twine through. I adhered lightweight 
chipboard to the back of the photo printed tag
first. The paper was too thin and kept wanting to curl.

The tag was the bottom 2 x 4 portion of the 4 x 6 print
I designed and had printed. The top portion is 
the 4 x 4 mini scrapbook page that is 
hanging inside the jar.
I created both portions separately then combined
them into one, resized to make a 4 x 6 print.

I placed the sea shell images
and the word stip on another 
4 x 6 print. These were created with
Photoshop Elements, the digital scrapbooking kit
and photo printed at a local store. 


After having the shells printed onto a piece of
photo paper, I trimmed them out with scissors.
I was originally going to add pop dots
behind the star fish for extra dimension
then decided not to because I was afraid
it would end up "warping" from humidity.
I could have taken the time to cut out chipboard
to back the photo paper with to make it more sturdy. 


I hung my photo about halfway across the jar.
I chose to do this because attaching it to the back
of the jar it was too far away to see well,
the glass was distorting the image.
I could have glued something such as strips
of chipboard to the back to poke down into the
sand to hold it in place, but decided against 
that becuase the real shells and drift inside
the jar were blocking the bottom portion of 
the mini scrapbook page.
Hanging it with fishing line helped
keep it just above the shells.
It's a neat floating effect, too!


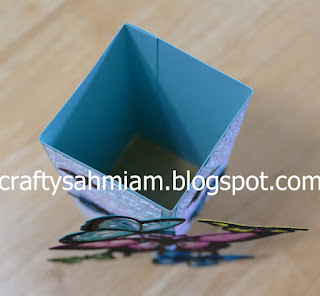
This photo is to try to show you how I hung
the photo inside the jar using clear fishing line
and clear packing tape. It is taped inside the
"neck" of the jar, suspending the photo 
while allowing the lid to still fit on the jar. 
I did back the photo with a piece of lightweight 
chipboard because it kept curling.


So there you have it, a sort of scrapbook jar. 

I hope I've inspired you to get crafty today -
or whenever you can find some time ;)

Have a good one !